


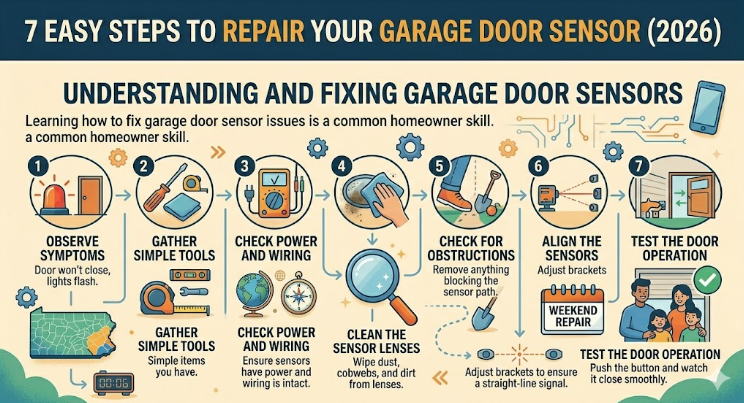
Have you ever pushed your garage door button only to see the lights flash while the door stays open? It a very common problem that most homeowners face at least once. Usually, the culprit is the safety sensors located at the bottom of your door tracks. These little “eyes” are designed to keep your family and pets safe by stopping the door if something is in the way. When they get dirty or move out of place, they stop the whole system from working. Learning how to fix garage door sensor issues is a skill that can save you a lot of money on repair bills. In this guide, we will walk through every step to get your door back in perfect working order using simple tools you already have in your garage.
Understanding the Safety Eye System
Before we jump into the repair, let’s look at how these parts work. Your garage door has two sensors: a sender and a receiver. One sends out an invisible infrared beam, and the other catches it. If that beam is broken, the door will not close because it thinks a person or a car is in the path. This is a vital safety feature required by law. When you are looking at how to fix garage door sensor problems, you are essentially making sure that invisible beam can travel from one side to the other without any interruptions. It is a simple concept, but even a tiny bit of dust can cause the whole system to fail suddenly.
Common Signs of a Bad Sensor
How do you know for sure that the sensors are the problem? There are a few clear “red flags” to watch for. First, if your door starts to close but then instantly reverses and goes back up, the sensors are likely to blame. Second, look at the small LED lights on the sensors themselves. One should be green and the other should be amber or red. If one light is flickering or completely dark, you have found your issue. Many people think the motor is broken, but learning how to fix garage door sensor lights is much cheaper than buying a new motor. If your wall button is flashing rapidly, that is another classic sign that the safety beam is interrupted.
Clean the Sensor Lenses
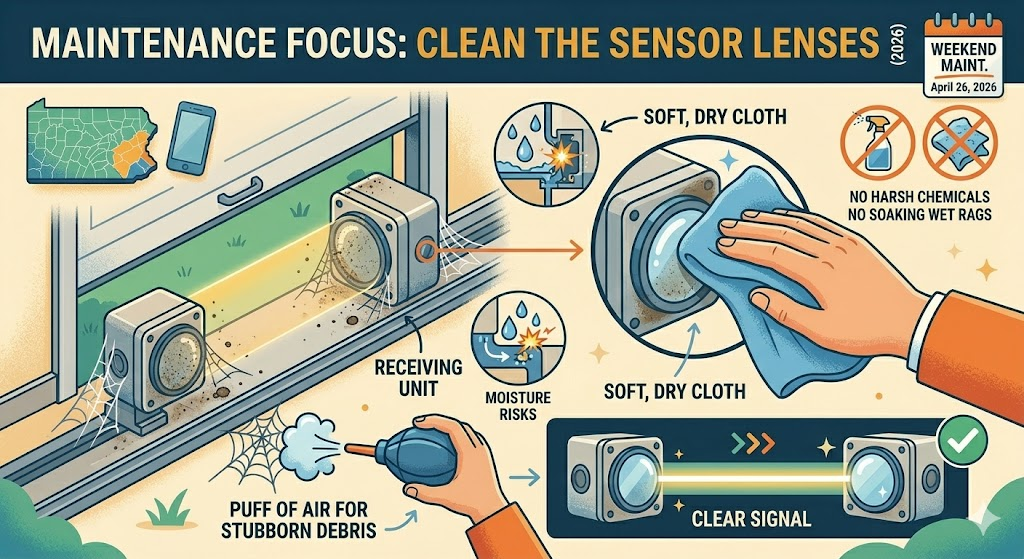
The most frequent reason for a sensor failure is actually just plain old dirt. Since these sensors sit just a few inches off the ground, they collect dust, spider webs, and even mud from rain. To begin your journey on how to fix garage door sensor issues, grab a soft, dry cloth. Gently wipe the glass lens on both the sending and receiving units. Do not use harsh chemicals or a soaking wet rag, as moisture can get inside the housing and cause a short circuit. Sometimes, a quick puff of air is all it takes to clear away a stubborn cobweb that was blocking the signal. It is amazing how often a simple cleaning fixes the “broken” door.
Check for Obstructions
It might sound silly, but sometimes the “fix” is just moving a broom or a trash can. We often stack boxes or garden tools near the garage door tracks without thinking. If even a tiny corner of a box sticks out into the path of the beam, the door will stay open. When you are studying how to fix garage door sensor errors, always do a “clear path” check first. Look for tall weeds growing near the outdoor tracks or even piles of leaves that might have blown inside. Even a hanging string from a bike or a toy can dangle into the beam’s path and cause the sensors to trigger the safety reverse.
Realign the Sensors
Over time, the vibrations from the garage door opening and closing can loosen the brackets. This causes the sensors to point away from each other. If they aren’t looking directly at one another, the beam won’t connect. To handle how to fix garage door sensor alignment, look at the brackets holding the sensors to the track. You can usually loosen the wing nut by hand. Gently wiggle the sensor until the LED light glows steady and stops blinking. Once both lights are solid, tighten the wing nut back down. This ensures that the “eyes” are locked in a straight line, allowing the signal to pass through perfectly every time.
Inspect the Wiring
If the lights are still off after cleaning and aligning, you might have a wiring problem. The thin wires running from the sensors to the motor can get pinched or chewed by pests like mice. When researching how to fix garage door sensor wiring, look for any white or black wires that look frayed or disconnected. Sometimes the staples used to hold the wire to the wall are driven in too hard, cutting through the insulation. If you see a break, you can strip the ends of the wires and twist them back together, covering the connection with electrical tape. Make sure the wires are tucked away so they don’t get caught in the moving door.
Check for Sunlight Interference
This is a “secret” problem that many people don’t know about. On very bright days, direct sunlight can actually overwhelm the infrared receiver. The sun acts like a giant flashlight that “blinds” the sensor, making it think there is an object in the way. If you find that you only have to ask how to fix garage door sensor problems during the afternoon when the sun is low, this is likely the cause. You can solve this by making a small “sun shield.” Use a piece of cardboard or a small tube to create a shade around the receiving sensor. This lets the beam in but keeps the bright sunlight out.
Test the Power Source
Every sensor needs a small amount of electricity to function. If neither light is on, the motor unit might not be sending power down the lines. As part of how to fix garage door sensor troubleshooting, check the back of your main garage door opener on the ceiling. Ensure the wires are firmly pushed into the terminal clips. Sometimes a power surge can blow a small fuse inside the unit, or the plug might have simply wiggled loose from the ceiling outlet. Checking the power is a vital step before you decide to throw away your sensors and buy new ones, as the problem might be at the source.
When to Replace the Sensors
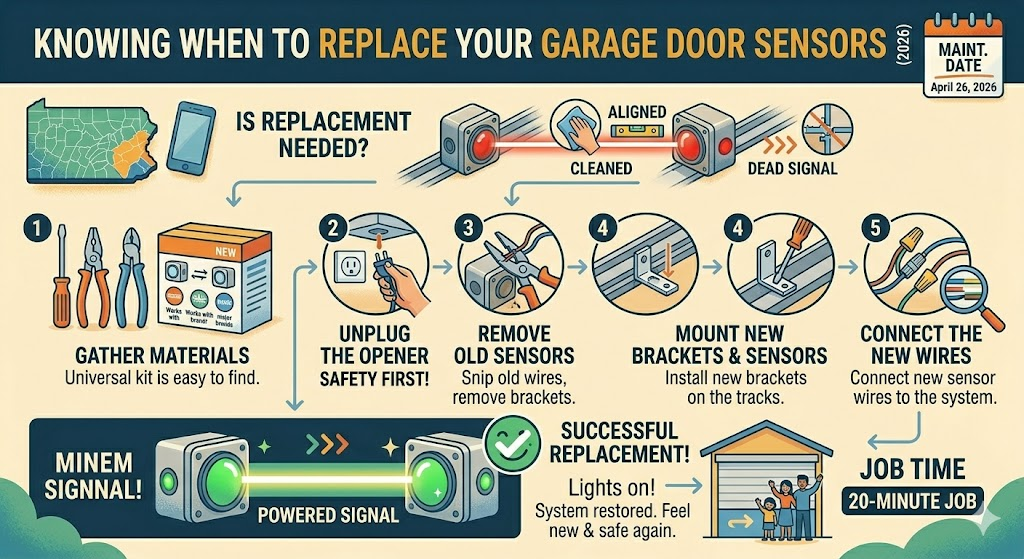
Sometimes, despite your best efforts, the sensors are simply dead. Internal components can wear out after years of exposure to heat and cold. If you have cleaned, aligned, and checked the wires but the lights still won’t come on, it is time for a replacement. Buying a new set is part of knowing how to fix garage door sensor issues for the long term. Most replacement kits are universal and work with major brands. You simply snip the old wires, mount the new brackets, and connect the new sensors. It is a 20-minute job that will make your garage door feel brand new and safe again.
Tools and Parts Needed for the Job
| Tool/Part | Purpose | Importance |
| Microfiber Cloth | Cleaning the lenses | High |
| Screwdriver/Wrench | Adjusting brackets | Medium |
| Electrical Tape | Repairing frayed wires | Low |
| Replacement Sensors | If internal parts fail | As Needed |
| Cardboard | Making a sun shield | Optional |
Frequently Asked Questions
1. What color should the lights be on my sensors?
On most models, one sensor (the sender) will have an amber or orange light, and the other (the receiver) will have a green light. Both should be solid. If either light is blinking, you need to know how to fix garage door sensor alignment or clean the lenses immediately.
2. Can I bypass the sensors to close the door?
Yes, in an emergency, you can usually hold down the wall button constantly until the door closes fully. However, this is not a permanent fix. You should learn how to fix garage door sensor problems right away to ensure the safety of your family and pets.
3. How high off the ground should sensors be?
Standard safety rules suggest that sensors should be mounted no higher than 6 inches off the floor. If they are too high, they might miss a small pet or a person lying down. Correct height is a key part of how to fix garage door sensor safety.
4. Why does my door open but won’t close?
This is the classic sign of a sensor issue. The sensors only prevent the door from closing. If the door opens fine but refuses to go down, you are definitely looking at a situation where you need to know how to fix garage door sensor obstructions or alignment.
5. Do spider webs really stop a garage door?
Yes! A single thick spider web across the lens can scatter the infrared beam. Spiders love the warm corners of a garage, so checking for webs is a top tip when learning how to fix garage door sensor failures.
6. Will any brand of sensor work with my opener?
Most modern sensors are “universal,” but it is always best to buy the same brand as your motor (like Chamberlain or LiftMaster). Using the right parts makes it much easier when you are figuring out how to fix garage door sensor issues.
Conclusion
Fixing your garage door doesn’t have to be a scary or expensive task. By following these steps, you now know how to fix garage door sensor problems like a pro. Most of the time, it just takes a little bit of cleaning and a gentle adjustment to get things back on track. Regular maintenance, like wiping the lenses every few months, can prevent these issues from happening in the future. Remember, these sensors are there to protect you, so keeping them in top shape is worth the effort. Now that your door is working, you can enjoy the peace of mind that comes with a safe and functional home!